Public Key Authentication using PuTTY and WinSCP
Public Key Authentication (PKA) is a more secure way to authenticate to a server than just using passwords. If you're security conscious (and who shouldn't be?) you'll want to enable it on your server for SFTP. Using PKA involves a little more effort during the set up phase than just passwords, but it's worth it for the added security.
Here, I demonstrate in the video and describe in the text how to generates keys in PuTTYgen, import and associate the public key with a user account in JSCAPE MFT Server Manager, and connect over SFTP using WinSCP.
1) Generate a public/private keypair using PuTTYgen (PuTTY Key Generator).
First, download PuTTYgen from this link : https://www.chiark.greenend.org.uk/~sgtatham/putty/download.html
You can either download just PuTTYgen or a Windows installer for most of the other PuTTY files.
If you use the Windows installer, you can run PuTTYgen from All Programs -> PuTTY -> PuTTYgen.
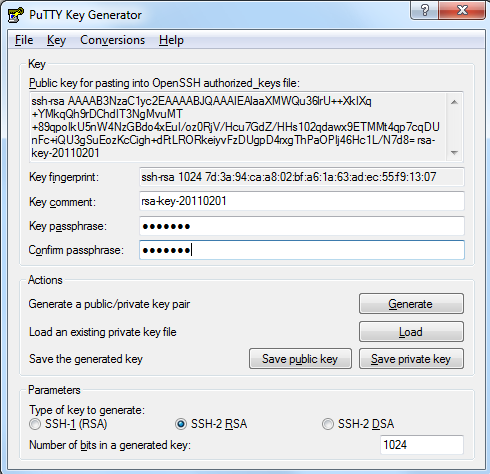
After you run PuTTYgen, click the Generate button to generate a public/private key pair. Then you'll want to put in a passphrase in the "Key Passphrase" and "Confirm Passphrase" fields. You'll need to remember the passphrase when you use your private key. Now you'll want to Save the public key and Save the private key by pressing their respective buttons and putting in a filename.
2) Import the public portion into the Client Keys tab in Key Manager in JSCAPE MFT Server Manager.
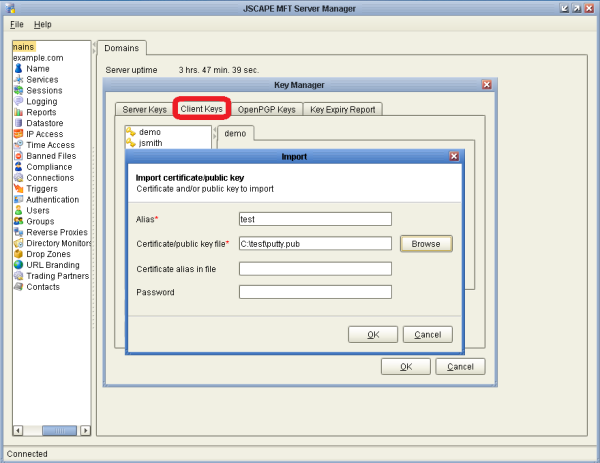
Now run JSCAPE MFT Server Manager. Then go to File -> Key Manager and make sure you click the Client Keys tab. (Make sure you're NOT on the Server Keys tab). From the Client Keys tab, click Import. From there, you'll put in an Alias like the login you're going to associate the public key with. Then click Browse, to select the public key file that you saved in Step 1. Then click OK to finishing importing the public key.
3) Associate with the user account on the User node in JSCAPE MFT Server Manager.
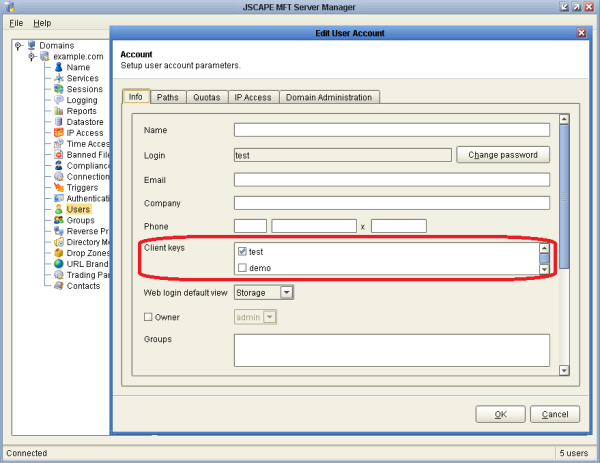
Go to the Users node then select the user account you want to associate with the public key you just imported. Click Edit to open up the Edit User Account window. Look at the Client Keys section. Depending on how many keys are on the server, you may have to scroll down. Double click the one you want. It will be named with the Alias you provided in Step 2. Click OK.
Note that to use, it MUST be enabled on the Services node, by clicking SFTP then edit. There you must change the Authentication type to "publickey", "password OR publickey", "password AND publickey". "publickey" means you login with just the public key and a password isn't used, "password OR publickey" means you could login with either a password or a public key, and "password AND publickey" means you can only login with both a password and public key.
4) Use the private key with WinSCP client to connect using the private key to the SFTP service on JSCAPE server.
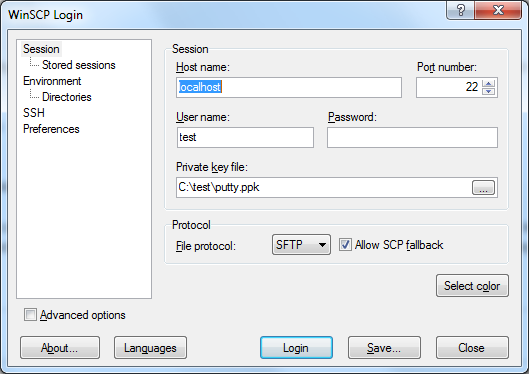
Run WinSCP.
Under Session, you'll want to fill out the Host name, user name, and password fields with the appropriate values. Click the button to the right of the Private key file field and browse to the Private key you saved at the end of Step 1. It will have a .ppk file extension. The protocol should be set to SFTP. If you're going to connect to this server again, click Save to save it. Now you can click Login. A "Key passphrase - user@server" window will pop up. Here you need to use the passphrase you entered (and remember forever) from the end of Step 1. Click OK and you'll be logged in!
Now that it's all set up, you can just click "Login" from WinSCP next time. It's just a small amount of worhtwhile effort at the beginning for vastly improved security.
References
JSCAPE MFT Server